
A WordPress members only area is a part of your site that only logged-in members can see: resources, recordings, a forum, a directory. WordPress can’t do this on its own, because its Private setting only covers Administrators and Editors. This guide builds a complete members area with the free WP User Manager plugin: a way to sign up and log in, a member role, pages only members can open, a menu that changes when they log in, and the right page to land on.
Steps 1, 2, 4, 5 and 6 are free. Step 3 has a free option for parts of a page and a paid addon for whole pages and sections.
What a WordPress members only area needs
Locking a page is the easy part. What makes a members area feel finished is everything around it:
- A way in: registration, login and password reset pages.
- A member role, so you can tell members apart from other accounts and give them access by role.
- Restricted content: pages or sections that ask visitors to log in or register.
- A members menu that shows “Member resources” and “Log out” to members, and “Log in” to everyone else.
- Somewhere to land after login and registration, and no WordPress dashboard for members.
If you want the whole site behind a login instead, for a club or an intranet, see how to make a WordPress site private. That’s one setting, covered in step 3.
Step 1: Install WP User Manager and check its pages
Install WP User Manager from Plugins > Add New and activate it. It creates the pages a members area needs: Log In, Register, Password Reset, Account and Profile, each with its form already on it.
Go to Users > Settings. On the General tab, check each page setting points at the right page. If you’d rather use your own pages, add the matching shortcodes to them and select them here.
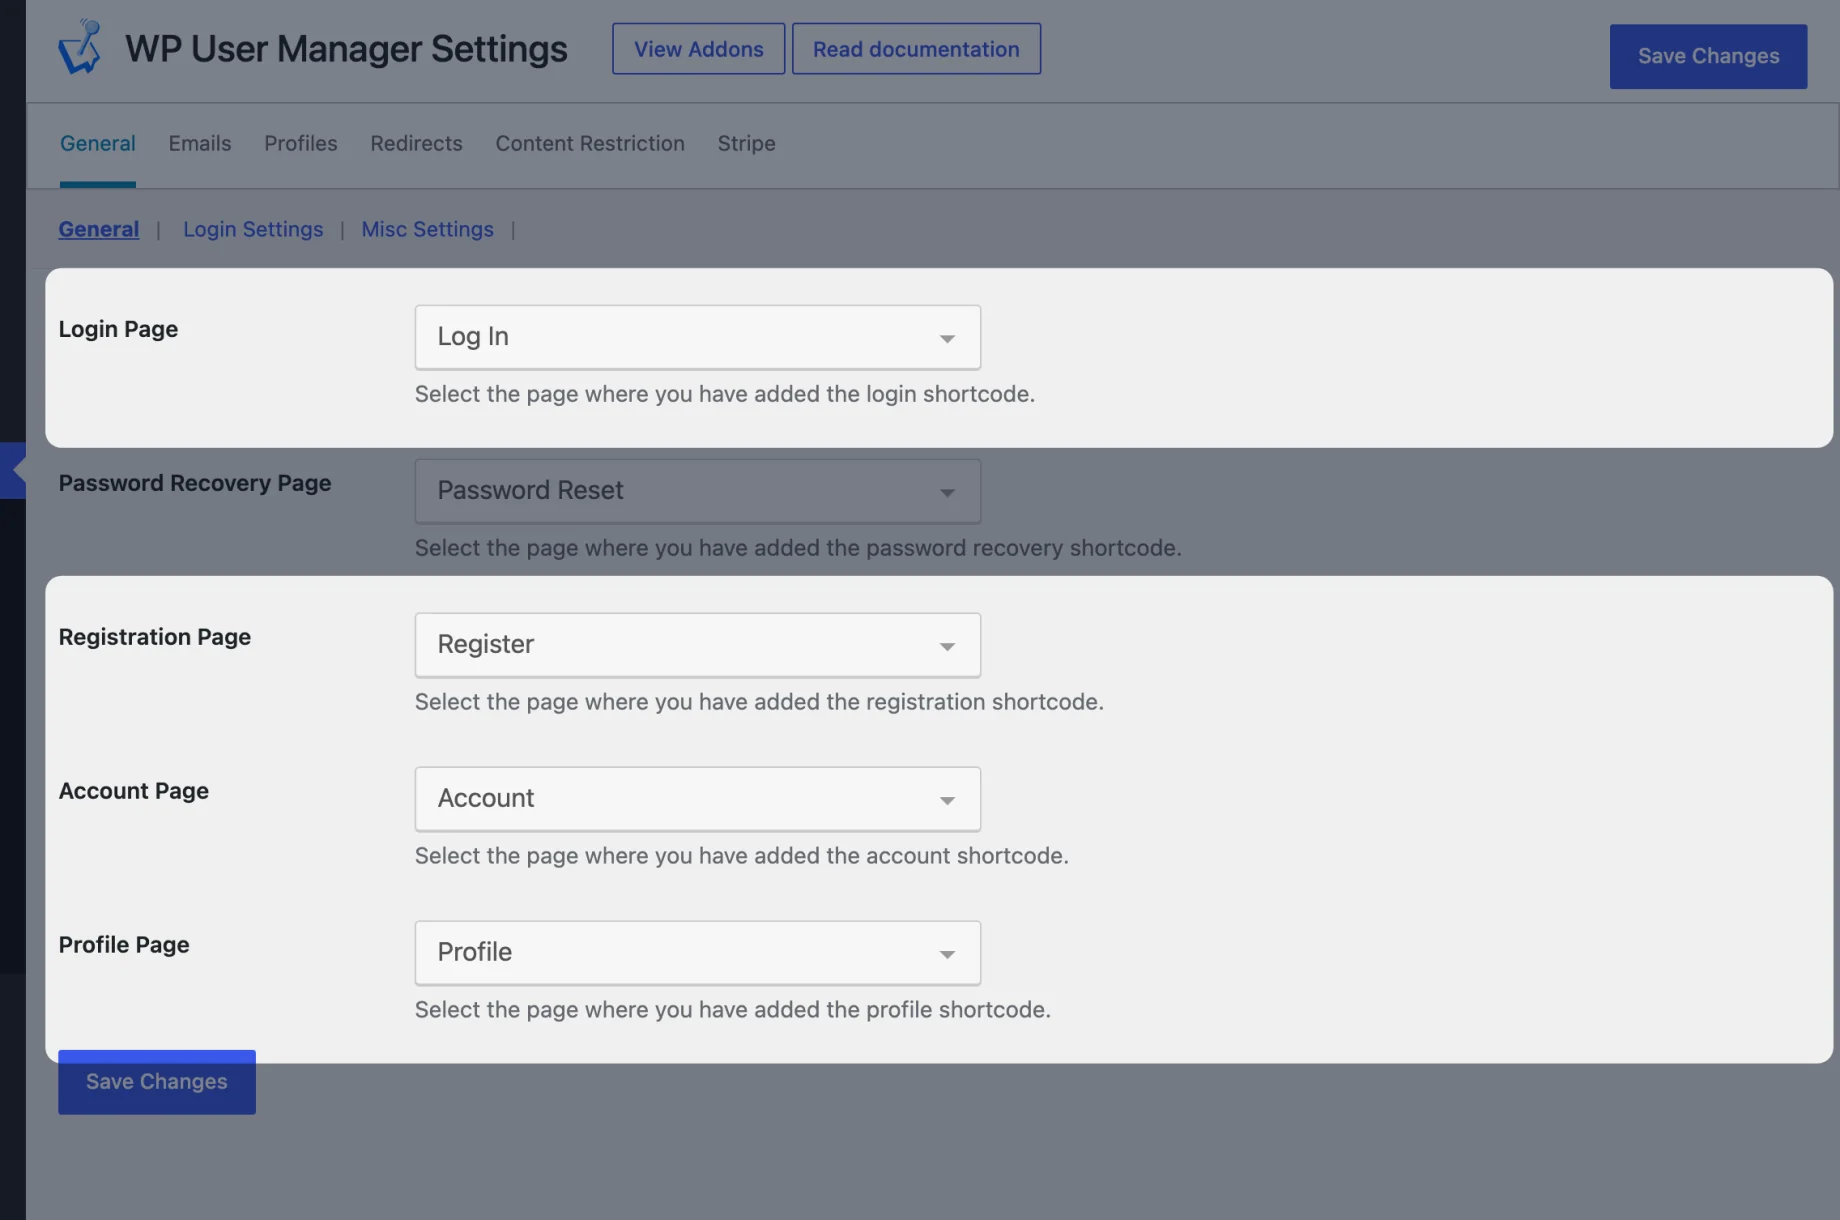
The Account page is where members change their details and password, view their profile and log out. You don’t have to build a “my account” area yourself. If you want to style the login and registration pages, our custom login page and custom registration form tutorials go further.
Step 2: Give members their own role
New accounts get WordPress’s default role, usually Subscriber. A role of their own makes everything after this easier: you can restrict pages to it, show menu items to it and keep it out of the dashboard, without touching other accounts.
- Go to Users > Roles (the roles editor), find Subscriber and click Duplicate, then Rename the copy to Member. Starting from Subscriber means members can read the site and edit their own profile, nothing more. (If you don’t see Roles, turn on Roles Editor under Users > Settings > General > Misc Settings.)
- Go to Users > Registration Forms, edit your form, open its Settings tab and set Registration Role to Member.
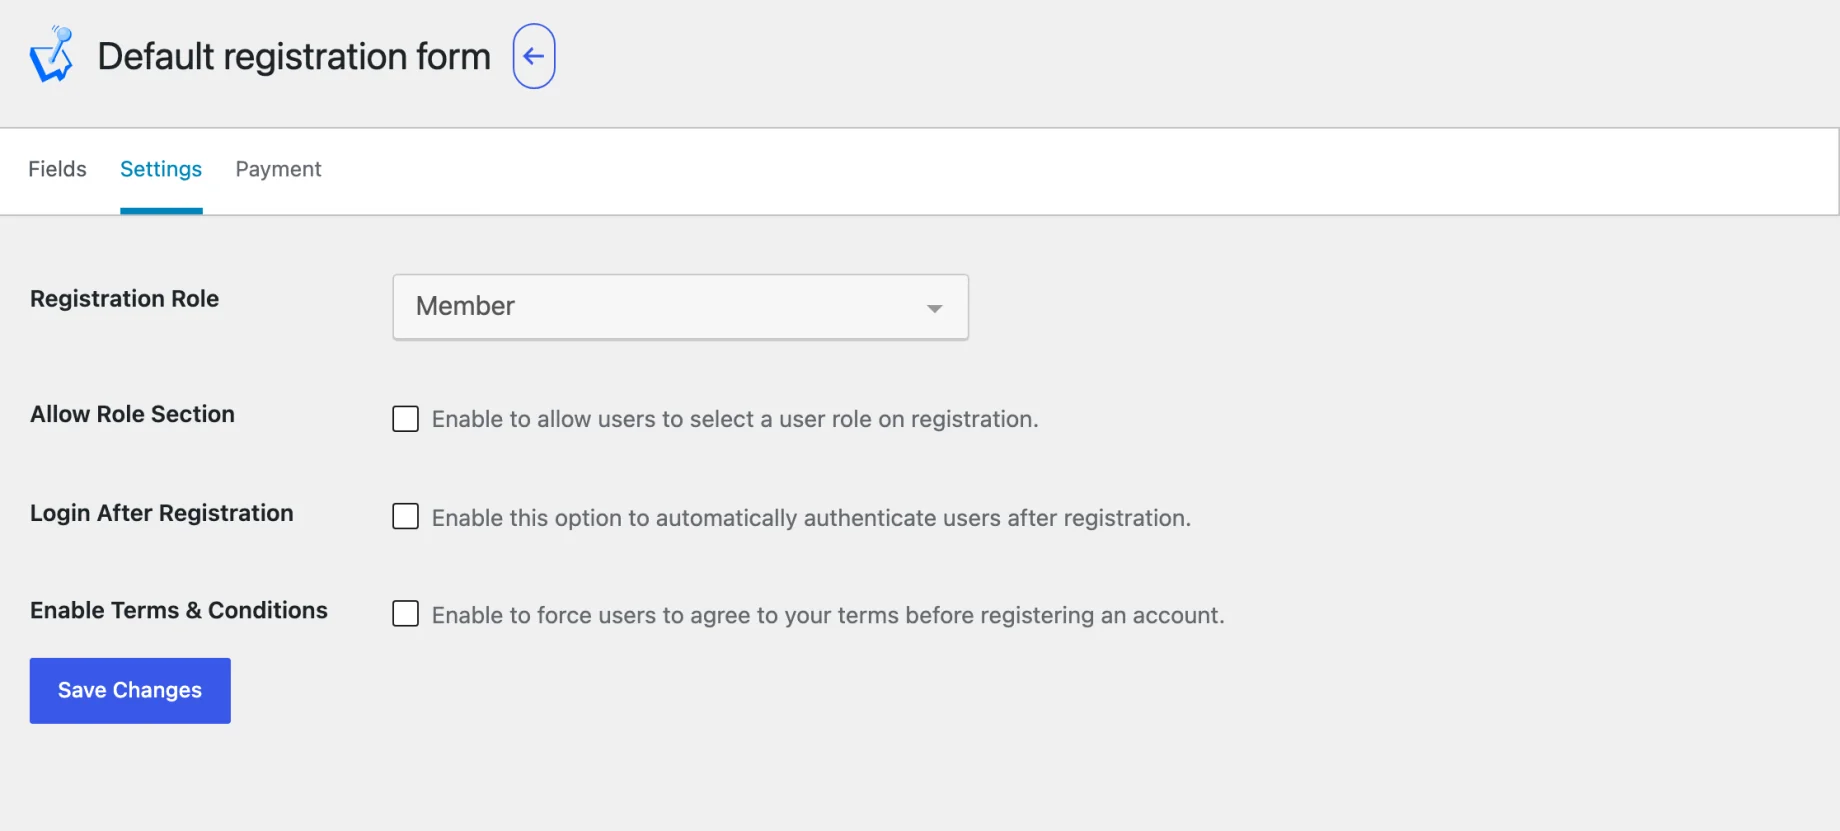
Everyone who signs up now becomes a Member. Existing users can be moved to the role from Users in the usual way. For more on what each role can do, see WordPress user roles and permissions explained.
Step 3: Restrict your members-only pages
Create the pages that belong to members, such as “Member resources”. Then choose how to restrict the content.
Part of a page: free shortcodes
WP User Manager’s restriction shortcodes hide anything you wrap in them. Everyone else sees “This content is available to members only” with links to log in or register.
[wpum_restrict_to_user_roles roles="member"]
Workshop recordings, templates and the member forum link go here.
[/wpum_restrict_to_user_roles]
Use [wpum_restrict_logged_in] for any logged-in user, or [wpum_restrict_to_users ids="4,12"] for named users. This works well for a members section on an otherwise public page. The shortcode reference lists every option.
Whole pages and sections: the Content Restriction addon
To lock whole pages, posts or categories, the Content Restriction addon (paid) adds a box to the editor. Tick Restrict access to this page, set Who can access this page to Logged in users, and pick Member under Restriction by role.
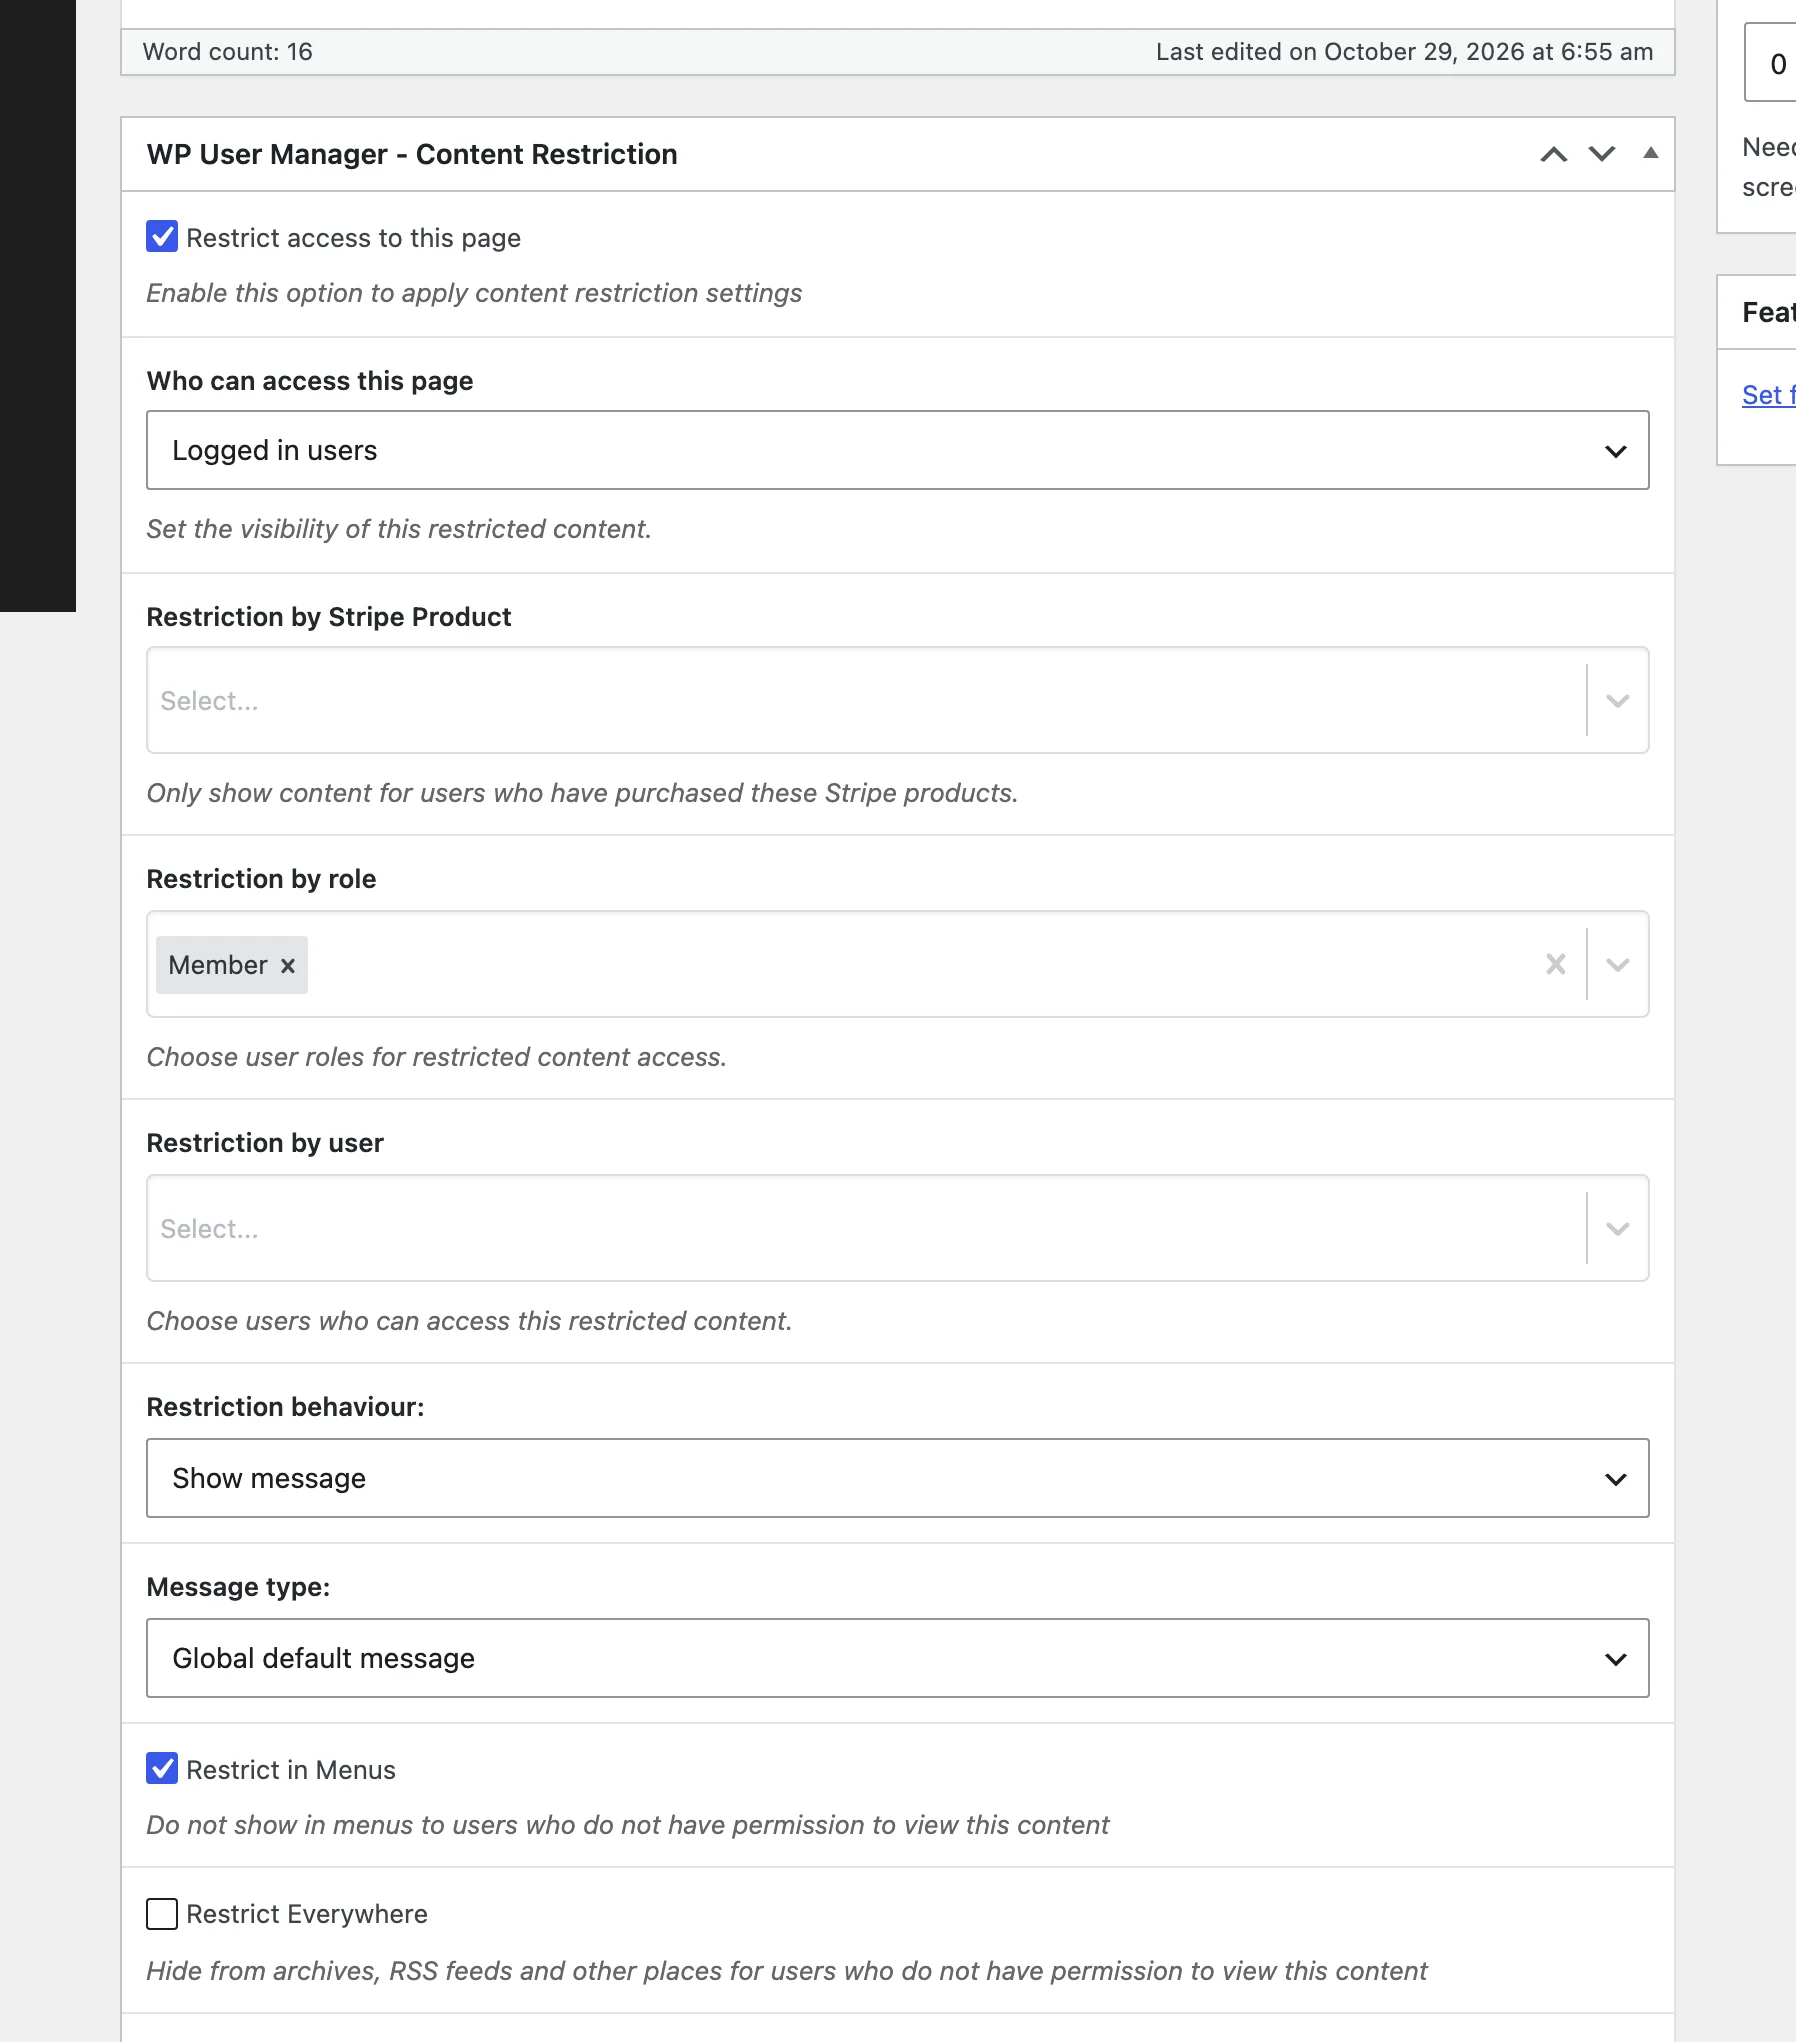
The settings that matter for a members area:
- Restriction behaviour: show a message in place of the content, or redirect to another page (your Register page, for example).
- Restrict Child pages: lock everything under a parent page, so a “Members” page and all its sub-pages share one setting.
- Restrict in Menus and Restrict Everywhere: hide the page from menus, archives and feeds for anyone who can’t open it.
- Restriction by Stripe Product: if members pay, only show it to customers who bought a product. See recurring payments with Stripe.
To lock a whole post type, such as a “Resources” custom post type, use the addon’s tab under Users > Settings > Content Restriction instead of editing each post.
Here’s what a visitor who isn’t logged in sees:

The whole site: one free setting
If nothing should be public, tick Prevent site access to visitors under Users > Settings > General > Login Settings. Visitors are sent to the login page. Allow site registration keeps the Register page open so new members can still sign up. This help article covers the details.
For when to use each approach, and how they compare with other plugins, see our content restriction plugins comparison.
Step 4: Add a members menu
A members area should be one click away for members and invisible to everyone else. WP User Manager adds three settings to every item in Appearance > Menus:
- Display to: Everyone, Logged in users or Logged out users.
- Select roles: narrow a logged-in item to certain roles, such as Member.
- Set as logout url: turn any item into a Log out link.
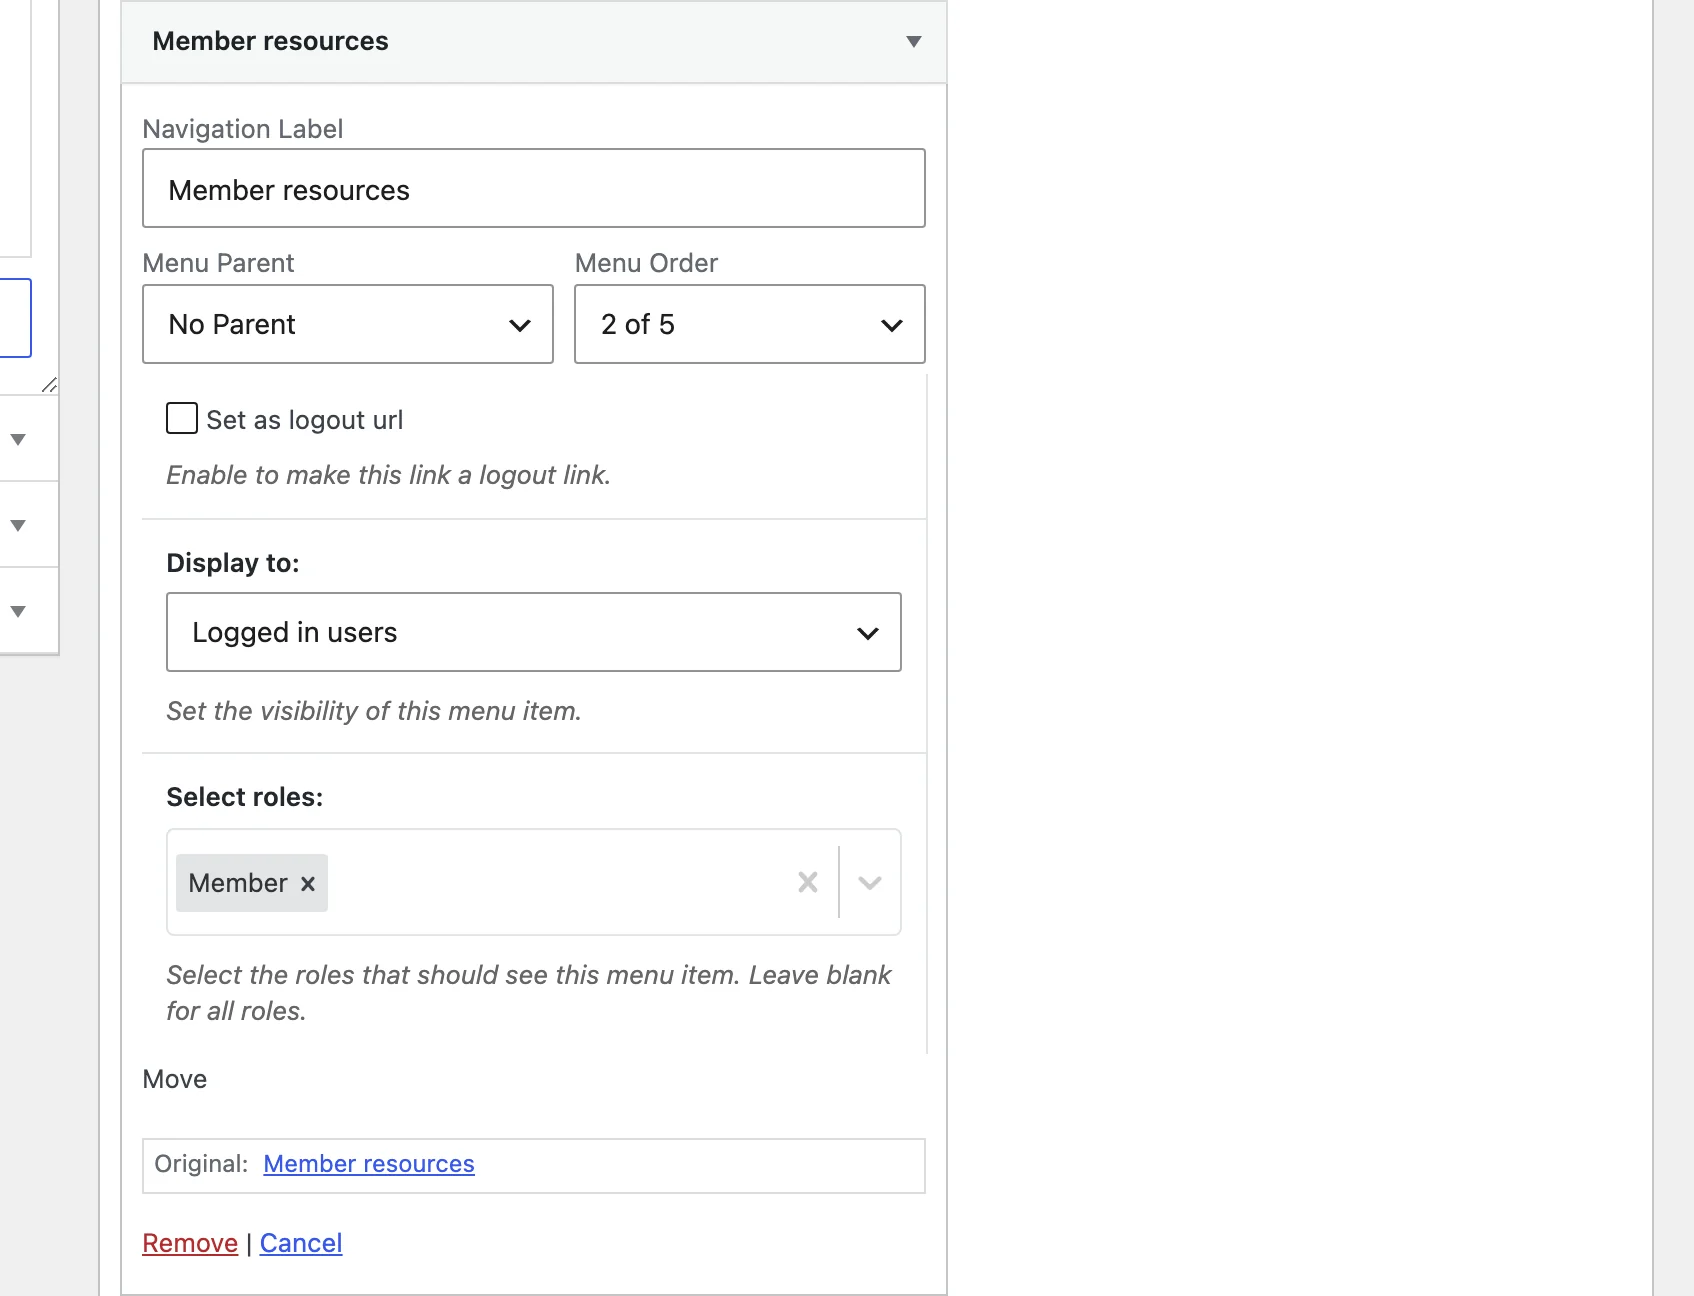
A typical setup is “Member resources” and “Account” for logged-in users, a “Log out” link for logged-in users, and “Log in” for logged-out users.
These settings, and Restrict in Menus from step 3, apply to classic menus (Appearance > Menus). Block themes such as Twenty Twenty-Five build menus with the Navigation block, which doesn’t use them. On a block theme, keep members links out of the main menu and put them on the page members land on after login (step 5).
Step 5: Send members to the right page
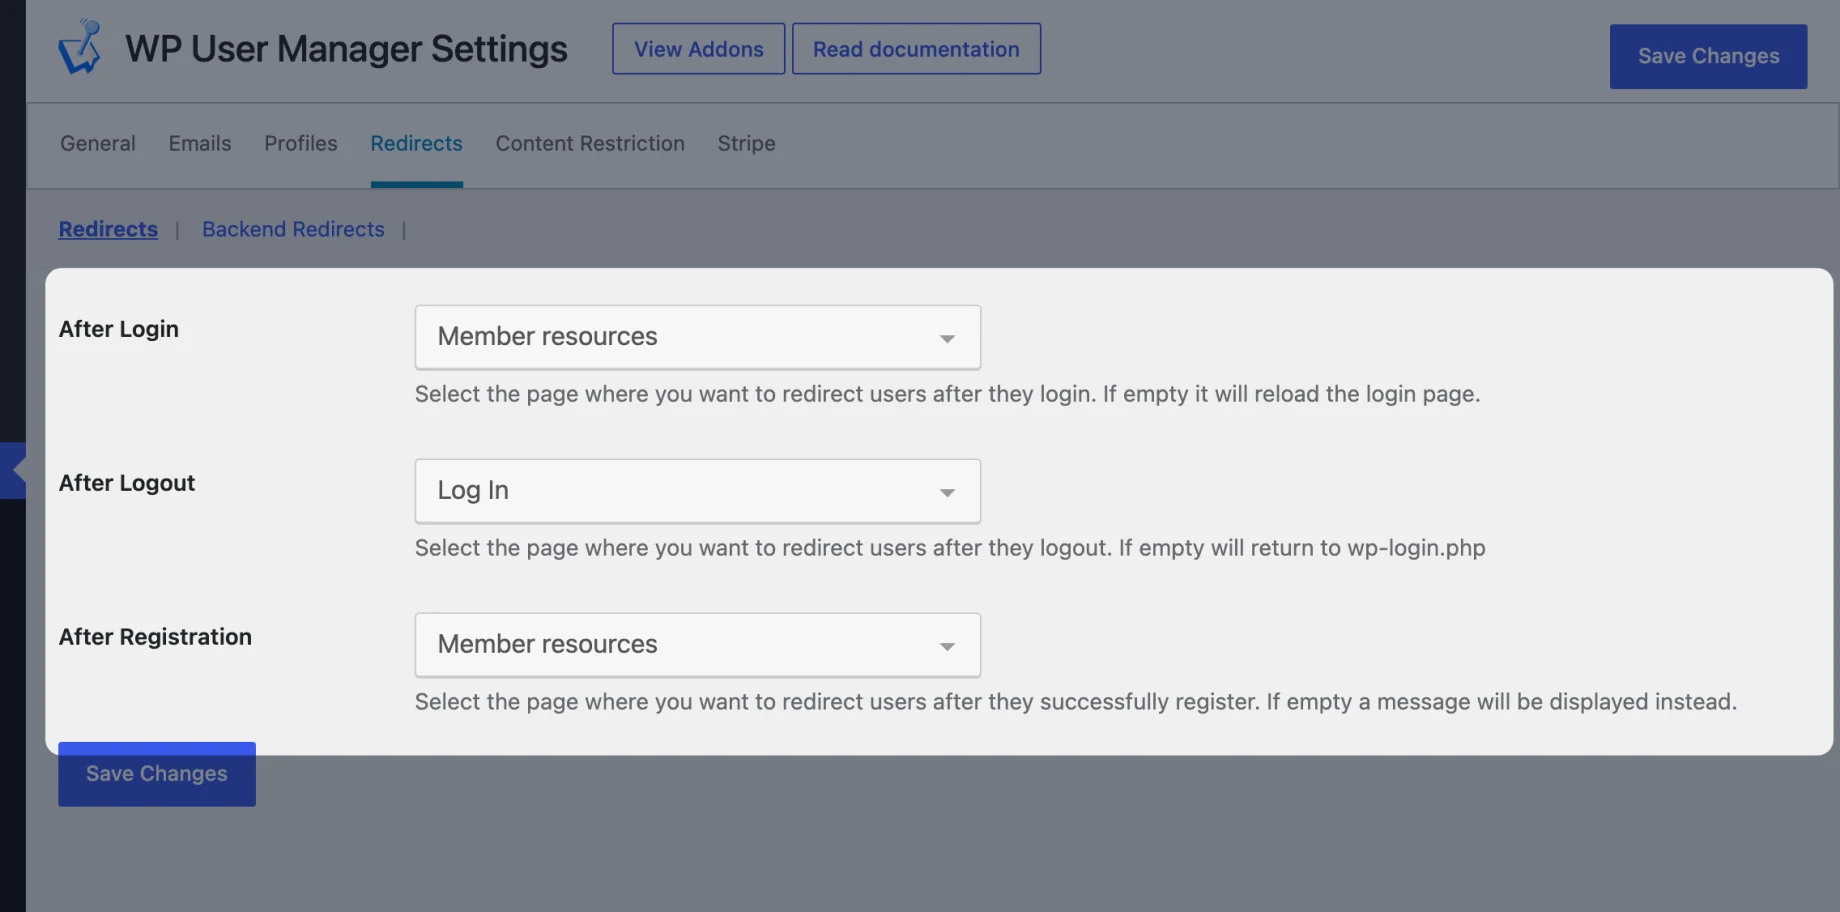
Under Users > Settings > Redirects, choose where people go:
- After Login: your members area, not the login page again.
- After Registration: the members area too, or a welcome page. Turn on Login After Registration in the registration form’s settings so new members don’t have to log in straight away.
- After Logout: your homepage or the login page.
For more ways to handle this, see how to redirect users after login.
Step 6: Keep members out of the dashboard
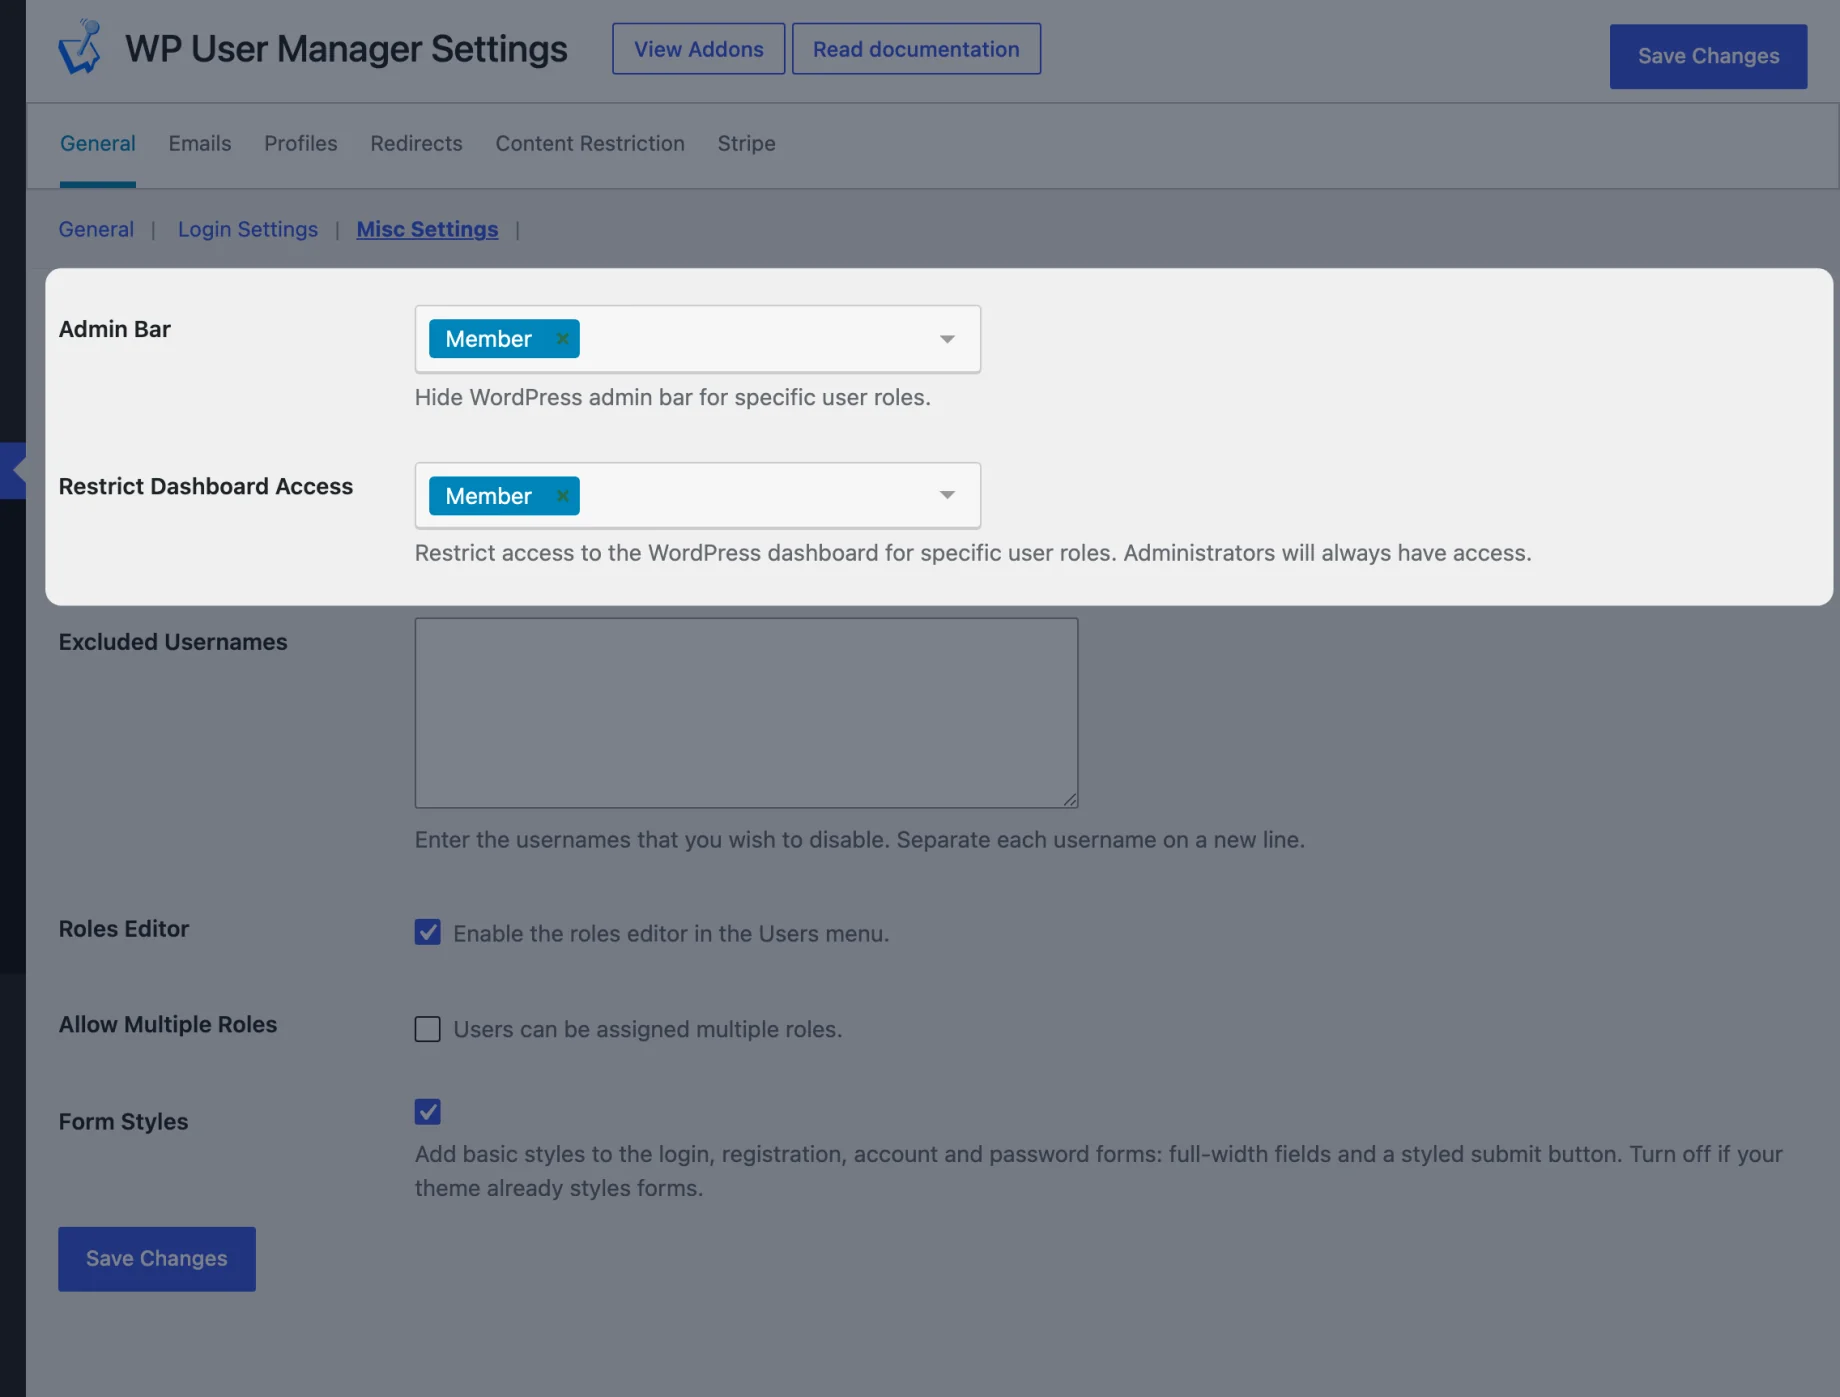
Members don’t need the WordPress admin. Under Users > Settings > General > Misc Settings:
- Admin Bar: add Member to hide the black admin bar at the top of the site.
- Restrict Dashboard Access: add Member so anyone in that role who opens
/wp-admin/is sent to your homepage. Administrators always keep access.
To stop members finding the default WordPress login screen, tick Lock Access to wp-login.php under Login Settings. Everyone then uses your own login page.
Test it as a member
Open your site in a private browser window and go through it as a visitor: open a members page, follow the register link, sign up, and check where you land and what the menu shows. Then log in as an existing Member and try /wp-admin/. Five minutes here catches a page you forgot to restrict.
Next steps for your members area
Once the area works, most sites add one of these:
- Member profiles and a directory, so members can find each other. Both are in the free plugin: see how to create a custom user profile page.
- Paid membership, with Stripe at registration, covered in how to build a membership site with WordPress.
- A community with groups and private discussions: see WordPress community plugins.
Everything in steps 1, 2, 4, 5 and 6 is in the free WP User Manager plugin on WordPress.org. Install it, and add the Content Restriction addon when you need whole pages locked.
